Sunday 10 November 2013

This Green & Pleasant Land

This was my second VBCW game using Chain of Command. Once again we played the patrol scenario using Anglican League and BUF platoons with no supports. So a fairly simple set-up with both sides evenly matched.

The table was dominated by a central village. Surrounding that, the ground was undulating and there were a good number of hedgerows and walls for cover.


Both sides' objective was straightforward; take & hold the village. Each ended up with three jump offs points strung out across the ground on their sides of the village; both rolled to have their patrol markers enter in the central section of the table.


The Anglicans began deploying a section of un-uniformed local militia (acting as just one team) and then a section of uniformed militia into the ground behind the village. The uniformed boys would soon head into the white building using their Lewis gun to dominate the road into the village.


The BUF took a similar approach, deploying their un-uniformed locals on the same side as their Anglican counterparts while using a uniformed section to approach the village from the other side.


Both sides approached cautiously. The BUF began to move their local militia around the hedges towards their opposite numbers while their uniformed colleagues approach tactically from the other side. A second uniformed section of Anglicans was deployed to contest the approaches and they sent their rifle team forward. So far it was all a bit tiptoing around.


At last contact is made. The BUF fire upon the Anglican rifle team and it begins to look as though the Anglicans might be over-extended as the BUF deploy their last section which advances towards the hill beyond the Anglican right.

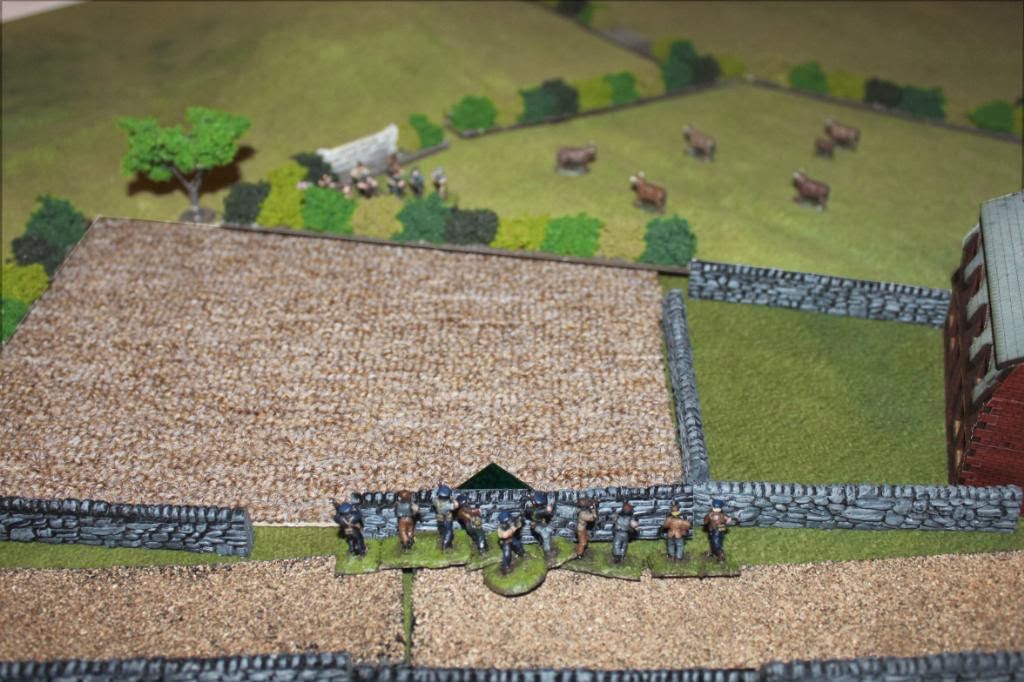
Meanwhile the two teams of locals faced off against each other. They traded shots against each other from cover for the rest of the game but not to any very decisive effect.


On the Anglican right crunch time approached as the two BUF sections closed in on one Anglican section which looked as though it might be caught in the open. Meanwhile another Anglican section rushes across the street into the row of houses which overlook the BUF. ...But they are too late the BUF came over the hill and caught the Anglicans in close combat. The Anglicans were already worn down somewhat by fire from the 1st BUF section. Their rifles were all but wiped up and the Lewis team ran back for cover, badly shocked.


There wass then an uneven  firefight between the two BUF sections and the Anglicans in the house which wore the Anglicans down again before another charge into close combat finished off the Anglicans. At that we called it a day and the Anglican local militia withdrew.

My thanks to John & Roger for playing; my apologies that I didn't always get photos at the the crucial points (eg the close combats) but I hope this captures the flavour. Next time support elements will be available (they are now on my painting table). My thanks to Jackie for helping to improve the photoes.


Tuesday 5 November 2013

The Battle of Vectis


Being an account of our lord Uffa's attack on the island of Vectis in the year the Christians call 476 by Brego the Bard. 

We returned to Britain's shores, to the lands which are rightfully ours but our peaceful overtures were rejected by their King, cursed be his name. He sent out his warband led by Constantine who we have bested before to dispute the isle. 

The lie of the land; note the centrally placed wood
We met in a field dominated by the Old Man's Wood; ground which Uffa said he liked well. Before the battle he made an attempt to rouse the troops but without success (in truth it was a woeful speech). Then our champion Hengest took up the challenge of  their Bedwyr. Both fought mightily and neither could get the better of the other; both returned to their warbands with honour (it was pretty much a draw).

On the Saxon left; warriors face off against the the British shieldwall
And so we came to the battle proper. Uffa's plan was simple, he said. He drew up his warriors on the left with Ana and Cynric while he himself went to the right of the wood with the hearthguard; our skirmishers were between them. As it turned out the British had also split their forces with two masses, one of levy and the other of warriors and companions on the left and a lighter force of warriors and levy on the right. The British did not delay and soon Ana was facing two formed shieldwalls.

While on the right, the hearthguard threaten
At this point Ana showed great guile and having drawn the British shieldwall forward, he feinted right leading his troops behind the wood. There were screams of frustration from the British, who called us cowards and questioned our manhood. Battle though is not 'fair' and it was the decisive moment breaking the Britons' plan. They broke their shieldwalls, which would never be reformed, and headed round their side of the wood; their levy quite swiftly but the companions and warriors getting caught up in the trees themselves

The hearthguard defeat their opponents while Ana's warriors feint left avoiding the shieldwall
Meanwhile on our right Ana's men had charged and they decisively defeated the Britons, who had not had a chance to form shieldwall. One group of levy were soon defeated entirely but more, it seemed, were on their way.
The hearthguard continue to rampage
Fortune favours the brave and Uffa struck again before the levy could intervene. The British were losing badly on the right. But what of the battle behind them?

Behind them Ana's warriors isolate the British companipulares on the edge of the wood
In the centre Cynric had lured the British warriors into a battle in the trees. In truth the two sides were well matched and they traded blows amid the branches. But for those vaunted comanipulares, things were less good. They emerged from the edge of the wood to find they faced Ana's two groups of warriors. Now the odds were more to Ana's liking and he charged decisively. The Romans were bested and were soon fleeing through the trees, their spears discarded... We are now masters of the Island.


In truth this was a good result for the Saxons; with hindsight the wood probably did favour them and "Ana's feint" was undoubtedly decisive causing the wheels to fall off the British plan. The British did not in fact loose that many more men but the Saxons consistently they came out with the initiative and did win all of the combat. So the onus is now on the Britons to try to dislodge the invaders from Vectis (the Isle of Wight).

My thanks to John & Derek for playing the game. Sorry it has taken me a while to write it up.

Sunday 20 October 2013

A VBCW Patrol Encounter with Chain of Command

I have mentioned before that I was intending to use the TFL Chain of Command rules for A Very British Civil War. Well I managed to try this out last week and I reckon it worked very well, especially for a first attempt.

I played the first 'Patrol' scenario using two forces BUF and Anglican. Each side had two sections of uniformed militia with a rifle and Lewis gun team each plus an un-uniformed militia section (just two rifle teams) and two senior leaders. There were no supports; I do plan to paint up a few British regulars for extra variety and some support elements when I get a chance. The game played very smoothly; the only real change I made to the standard rules was to allow for stoppage of Lewis guns if they roll more 1's than 6's (a rule borrowed from Mud & Blood).

The critical moment of the game was when the BUF advanced one of their rifle teams to try to outflank the Anglicans 'cowering' behind one of the hedges, while leaving their Lewis gun team behind in one of the buildings. That meant bearing down on one of the Anglican's jump-off point. The Anglicans still had a section in reserve and, surprisingly enough, they popped out from behind the hedge to ambush those poor fascists. Even though their Lewis gun did stick (!) it was still pretty devastating and in the next phase they were able to get the BUF team in close combat almost wiping them out. The BUF men with the Lewis gun could only look on helplessly and then they were thoroughly outgunned by the Anglicans behind the hedge (who in truth were pretty luck). After that it was only going to end one way.

So its 1-0 to the Bish's men and I look forward to having a chance to give it another go soon (hopefully in another week or two). The only slight comment on the rules I had was that hardly any of the units seemed to accumulate much shock; there were rather more kills and what little shock there was seemed to be rallied off quite easily. It could just have been a bit of a quirk of the dice; we'll see how it goes next time.

Final position of the patrol markers & jump-off points (blue for Anglicans, red for BUF).
The BUF appeared to have the better of the patrol phase

Un-uniformed Anglican militia. In the background you can just make out their uniformed colleagues
(sorry, focus not great)

The BUF advance to outflank Anglicans cowering behind the hedge

...and are ambushed by another Anglican section deploying 

After defeating the first BUF section, the Bish's men advance toward the buildings. 

They will in fact end up behind this BUF section - not good

Sunday 29 September 2013

Sharp Practice - Un moment de friction

Last weekend I had the pleasure of playing Sharp Practice with my old friend Mike of Trouble at T'Mill over in Peterborough. He has already published an AAR which you can find here. Here is the French side of the encounter, through the eyes of Capitaine Le Gros. Each side had six groups of infantry plus one light cannon and was led by four big men, including Captain Fondler and Capitaine Le Gros.

The table including some very fine hedges & woods
There was also a hill just off-camera to the left
Messieurs, I have to report a small but significant victoire over les Anglais near the village of Gemappes. Our troops encountered a mixed force of line and rifles with one cannon in support led, it turns out, by the infamous Captain Fondleur. Our scouts in the village spotted some British line on the opposite side of the river. I detached Caporal Epinace and a cannon to open fire on them while my force, a mix of fusiliers et grenadiers, advanced smartly towards woods in the centre.

Corporal Coventry and the British line
There was an initial exchange of fire as the British targeted our fusiliers while our cannon opened up on them; our fire, it must be said, could have been more accurate. Perhaps Epinace needs glasses. Further to my left Lt Petain showed some hesitance in advancing on the British position, which was secured behind a hedge (as was he himself) while on the flank Lt Legume led his voltigeurs towards the hills on the extreme left hoping to out-flank the enemie.

French gunners target the riflemen (and vice versa)
Before long the British line had been driven back to shelter behind the woods, but a new threat emerged on our right; British rifles approaching the village and threatening to outflank us as we had only a few scouts there (a dummy blind). The riflemen were able to get the better of our cannon, with their dreaded 'Sharp Practice' and for a while things were looking less than than rosie. In the centre Lt Petain had decided to take his men further over to the left and had deployed them en ligne; I cannot understand why he did not use la colonne.

Capt Le Gros & Corp Coventry meet in the woods
Before all was lost j'ai graspé le moment and led mes braves into the woods and then on to shoot at the British cowering behind ze 'edge. Then just as the second group of British line came into the forêt, I rallied my men and we charged. This was the moment on which the battle turned. The grenadiers were in their element and the British were made to run. Meanwhile on the left Legume's voltigeurs had succeeded in enfilading the British cannon and their line, delivering a crashing volley which caused chaos in the British ranks.

Ltn Petain finally gets his men moving
It was now looking as though victoire was ours. Lt Petain had finally moved somewhere useful and came over to the right to counter the threat of the rifles. They did not give in though and the rifles skillfully withdrew to threaten my men, and cover their retreat. Sadly Fondleur escaped to fight another day. Next time, I will catch him. For the moment though les Ros-Beoufs will think twice before tangling with us again. Vive L'Empereur!

At game end - French skirmishers overlooking the retreating British
In truth the encounter was rather closer than Capitaine LeGros admits. The fact that he got the initiative, having a chance to first play a Standfast card to rally his troops in the wood and then a Pas de Charge to charge the British was decisive. If it had been the other way round and the British had the initiative, and a chance to use their Thin Red Line card, it could have gone very differently.


Sunday 22 September 2013

Blackbeard


Ahoy there, m' heartries.

I should have posted something on this a couple of days ago for 'Talk like a pirate' day, but better late than never.

Recently I have played a couple of games of GMT's Blackbeard - The Golden Age of Piracy game, which I picked up in a sale a few months ago. This is a redesign published in 2008 of the original Avalon Hill Blackbeard game from the 1980's - I've never played the original but I understand it was a lot more fiddly and probably less fun.


It's a card-driven game which is supposed to play in 2-3 hours; once through the deck and the game is over. You control up to 3 pirates who generally make hay looting merchant ships and attacking ports before returning to a port where you can convert your loot to personal wealth. And then you are subject to 'Debauchery & Revellry' missing a turn or two. There are warships to avoid but the real foe are the 'King's Commisioners' who appear once your pirates acquire enough notoriety. The trick is get your pirate to retire safely before he is caught by a KC (unless you have a letter of Marque up your sleeve). In many ways it feels like a board game version of the Sid Meier Pirates computer game.

The Board at the end of a Game

Overall I have enjoyed playing. It's got a pretty high luck factor; if you don't see the funny side when your pirate is displaced by a mutiny or by someone else's pirate who turns out to have been in your crew & beats you in a duel taking all the loot you've 'earned' then this isn't the game for you. In truth there are a few places where I would like to iron out the wilder effects of the dice rolls and I would possibly try to change a thing or two to get a bit more action into the game. 

and the active pirates at the end of the same game

One of the things I do really like is that the rules include as background mini-biographies of all 23 pirates in the game. These are all historical figures such as John Rackham, Bartholomew Roberts (the 'Dread Pirate Roberts') and of course Edward Teach himself.

A biography from the rule book

Sunday 8 September 2013

Flodden 500 (or What I did on my holidays)

September 9th will be the 500th anniversary of the Battle of Flodden, the biggest defeat of the Scots by the English, at least terms of men killed. Rather by coincidence I went on holiday this year to the Scottish Borders and had the opportunity to find out more about this battle. I thought would put down something about the places we visited.

The battle actually took place rather closer to Branxton in Northumberland than Flodden (and it is sometimes called the Battle of Branxton). As well as the battlefield itself, there is an excellent exhibition at Etal Castle which is just a few miles away and is one of the castles which was captured by the Scots during their campaign; there is no visitor centre at the battlefield so a visit to Etal is well worthwhile. We also visited a small exhibition at the 'Old Guard' in Berwick-upon-Tweed

In the battle many of the Scots were armed with pikes, and had been trained by the French. The English, in contrast, had an army similar to that of the Wars of the Roses with many billmen as well as longbows.

Etal - display of English bills
and Scottish pikes


The two sides drew up on opposing hills; the English to the north of the Scots. The Scots led by James IV and the English by the  Earl of Surrey who had flank marched his men around the Scottish army. It was dull, damp and muddy having rained for most of the day.

The battle field from the English side -
in the middle distance you can see the dip in the land
Between the two armies was a dip. When the Scots got there they discovered it had turned into a marsh. Their pikemen lost all cohesion and instead of having the advantage over the shorter bills the pikes became unwieldy and were cut aside by the English.

The killing ground
The dip is still quite boggy even today now that the land has been drained

Looking up from the dip towards the English side
James IV led his men bravely in a desperate attempt to win victory, but he was cut down close to the Earl. He was the last British monarch to be killed in a battle.

"The Kynge of Scottes cam with a grete puyssaunce
upon my Lorde of Surrey, having on his lyfte hande
my Lorde Darcy son, which 2 bare alle the brounte
of the bataillle, and there the Kynge of Scottes was
slayne within a spere lengthe from the said Erle of 
Surrey, and many noble men of the Scottes slayne moo [more]"
     From the Articules of the bataillle bitwix the Kynge of 
Scottes and the Erle of Surrey', written shortly after the
battle by Thomas Howard, the Lord Admiral

In all, it is said that more than 10,000 Scots and 4,000 English died.

The memorial to the dead of both sides- erected 1910

Etal - prominent Scottish nobles who were killed
Including James IV, the Archbishop of St Andrews and the Bishop of the Isles 
Branxton church, nearby, was used as a mortuary after the battle


A few weeks before we were there, there was apparently a re-enactment event near Etal. Although I missed that I did get to an English Heritage living history event at Framlingham Castle a couple of weeks ago which was themed around Flodden:

A demonstration of the reach advantage of pike over bill
note how straight the pike isn't
Two 'knights' battle it out

Finally I could not resist putting in one toy soldier photo in this post:

Your author taking photoes of a small figure display at Etal
This is of course a gross oversimplification of the Battle of Flodden, but it will gives you a flavour from what I saw on my holidays.You can find out more for example at http://www.flodden.net/ or http://www.flodden1513.com/

Monday 26 August 2013

Bank Holiday Weekend

What have I been up to over the long weekend? There are two things of possible interest.

First I attempted to play a napoleonic game using a 'hybrid' set of rules, based on two sets keeping the bits I like and discarding those I don't. Unfortunately this was not a great success and some of the results just did not feel right. So I think its back to the drawing board with these ideas; you don't know that though until you try.

Second, we went to a Flodden re-enactment event at Framlingham Castle in Suffolk. (Framlingham is a good choice as it has a connection in that it was owned by the Howard family, which included Thomas Howard, the victor of Flodden). This was not an actual re-enactment of the battle but a 'living history' event with talks about the battle and tudor life in general, story telling, weapons displays etc. I found it very interesting and will be talking more about Flodden in another post in the near future, I hope.

Framlingham Castle - Outside

Inside - Living history

The Earl of Surrey talks about Flodden Field

I did manage to get a few decent pictures on the napoleonic game which are here:

French Columns attack the British line
Fierce Fighting in the Woods
French Dragoons bounce off a square


Wednesday 21 August 2013

Chain of Command: First Impressions

The new Too Fat Lardies skirmish rules, designed for WWII are released today and my copy dropped through my letterbox this morning. In my previous post I said I would be using these for VBCW, so I thought I would put up a couple of not-very-serious comments, though the 'voices' of some of my big men:


I did promise previously to post a couple of photos of my big men figures. I didn't manage it before I went
on holiday, so here they are now:

Anglican Leaders
BUF Leaders
I decided give the senior leaders a hexagonal base to help distinguish them from the junior leaders with round bases. I am particularly pleased with the BUF officer in his red coat.