Tuesday 23 December 2014

Counterattack at the Old House


Another game of VBCW Chain of Command which I played last week with Chris P.

It's been a while since we played but having three very fine new houses from Hacme, I was keen to get another game in. This was played with the Attack/Defend scenario with the BUF attacking and an Anglian force defending. Chris took the BUF with a standard paramilitary platoon supported by a Vickers MkVI light tank and an 18pdr field gun while I had a mixed force of militia and one section of sailors (12 men but no MG) supported by a Morris armoured car. It was a game played in excellent spirit and we both thoroughly enjoyed it.


I confess though that I didn't do very well....


Here we see the first of my sections deploys to defend the Old House; see how they are still some way back from it though. Their MG manned the wall just next to front of the house while the rifle team went inside (and were promptly killed by some very concentrated fire).


My A/C bravely foolishly drove down the road (A/C's do tend to like roads) hoping to deter any BUF armour. Unfortunately an AT rifle team popped up from beside the building and in their first shot killed my driver. This didn't actually immobilise the A/C but effectively it did.


Here we see the remains of my rifle team running; they left promptly as Chris ended the turn, taking their leader with them, (that's bad). Meanwhile the ATR continued to bounce shots off my A/C until eventually it had excess shock and the crew bailed out.


Here is a nice shot from the other end of the table (courtesy of Chris) showing his Vickers tank which wisely kept well away back from my A/C and any possible ATR of mine. It added useful support to his infantry from distance.


While on the other side the BUF deployed an old 18pdr field gun in a position which was well placed to dominate at least half the table. Also as it fires HE it reduces cover by one level.


To counter the field gun  the Anglicans deployed their sailors who did shoot up the gun crew a bit (but not enough). They also tried to get flanking fire on BUF infantry in the centre but their over-enthusiasm saw them break cover and become dangerously exposed (I rolled a double 6 for movement).


By this stage I could see the writing on the wall. However I deployed my final section in the centre to try to support (more replace) the first lot. They were quickly shot up and my forces withdrew badly demoralised.


So the final result: an emphatic BUF victory. Here is the BUF's morale at the end of the game.


..and here is the Anglican's.


In fact I did not even force my opponent to make even one roll on the force morale table and I only managed to kill 4 of his men. I lost count of how many I lost. (In fact I said well before the end that I would have withdrawn but we carried on as there was plenty of time before dinner).

With hindsight I now realise that I did not get my jump off points in positions where they could really support each other and I probably tried to defend a position too far up the table, though I was supposed to be defending the the village and specifically the 'Old House', which is the green one. (I had some pretty poor rolls too). Chris on the other hand managed to get his jump off points in positions where they were all really useful and was able to deploy his troops very effectively.


Finally, MERRY CHRISTMAS EVERYONE

Saturday 20 December 2014

Black Powder - 1815


A few weeks ago (I am behind with updating the blog, again) my good friend Derek came around to play a Napoleonic game. We essentially used the Black Powder rules with about a dozen units on each side on the grounds they should be fun and quite simple .

I have had Black Powder for a while but have never done very much with it. I'll confess that I not much enamored with all the mechanics. For example the Command mechanic which makes a triple move so much more likely than than a double move; I do think this can be quite easily fixed though by making a double move the maximum available and allowing this on a roll of 3 or more less than command (I am an incorrigible fiddler with rules). I also made a few other minor rule changes including introducing a penalty to shooting for units which have just moved.

The scenario was intended to be straightforward with one infantry brigade (4 units) per side initially quickly followed by the arrival of a brigade of cavalry and then somewhat later by a second brigade of infantry. I, as the allied player, chose to have Brunswickers initially (I could have had Dutch if I'd preferred) followed by a brigade of British/Highland Infantry. The French were umm, French; their second brigade were Guards (a somewhat unusual appearance on the table for them). Unfortunately, due to poor scenario design on my part the game didn't get anywhere near finishing and sadly neither the Britigh infantry nor the Grognards got to play much part. However as a proof of concept it was well worthwhile and we learnt a good deal about how these rules work. It was also very good fun.

Derek definitely had the edge, in that he took the farm in the centre and beat my cavalry; his lancers saw off two units of British dragoons. Here are a few pics of the game; we used 15mm figs with a relatively small number per unit (typically 12 for an infantry unit) and a 50% reduction in scale.

The French Commanders meet for an early drink at the inn 

French infantry close in on the farm

French cavalry arrives:
and then promptly leaves again after a blundered command roll!

Brunswickers support their skirmishers who hold the farm

The French assault the farm (and are initially thrown back)...

... and the line unit in support

British infantry starts to arrive...

... but the Grognards are ahead of them

The British dragoons are beaten by French lancers

Game End: the French have now taken the farm

But the British are still forming a defence

In the centre a disordered square holds off French Chasseurs

Hoping to return with more soon

Sunday 30 November 2014

Citadel Foundation Paints


It's been at least a couple of years now since GW got rid of their Citadel range of 'foundation' paints. Personally I was always fond of them as I think you give a very nice base layer that you can then do other stuff with. My stocks of most of the ones I've been using have now hit a critical point.

For most things nowadays I have moved over to Coat d'arms paints but I havn't found a good substitute for the foundations. So, inspired by some recent E-bay activity of my good lady, I decided to try there. I found a complete set; but it was in Australia and I'd prefer not to fly stuff half way round the world so I passed on that.

Then I tried Amazon and rather to my surprise was able to pick up a pretty good haul (see above) just from a simple order. They were more expensive (I recall about £4.50 a pot) but worth it at least for me. Should keep me in foundations paints at least for a while yet.

In the meantime if anyone knows where to get some Calthan Brown or Necrite Red or indeed more generally a good replacement for the foundation paints I'd be very grateful.


Tuesday 18 November 2014

VBCW: Forces for BIG Chain of Command

Just as I was getting towards the end of my VBCW project a month or two ago, TFL published their (free) BIG Chain of Command supplement. A quick count up and I found rather to my surprise that I was actually within touching distance of having the figures I needed for it. A small order from Peter Pig and here we are so I thought I would show off the various platoon options that I have available. 

Whether I will actually do big CoC is not yet decided but it certainly gives me plenty of options to play with...

The buildings here are my latest acquisition. They were commissioned from HACME.  They are local buildings from my village and I am VERY pleased with them. They are still working on a church for me; I am looking forward to seeing that.


Anglican militia (at Flemdyke House)


BUF militia (at the Six Bells - why do the fascists get the beer?)

Irregular militia with an Anglican flavour (I might have some of the wrong big men!)

Irregular militia with an BUF flavour
(there is also an option for militia unconnected with either)

British regulars at the Old House (only half painted yet)

Here are the regular's missing mortar and ATR teams, a couple of  their leaders and a tripod MG support in the background. 

And finally, my vehicle collection: three trucks, 2 armoured cars (Lanchester & Rolls Royce) and a Vickers Mark VI tank, not forgetting the bicycles. There are also a couple more vehicles still on the painting table.

I also have a couple more, non-standard sections, but I'll keep those under wraps for now, (in some cases because they are unpainted).

All figures are by Peter Pig (15mm). Vehicles are PP, QRF or Zvezda.


Sunday 9 November 2014

Poppies


As it's Remembrance Sunday, I thought that I would post a few pictures of the poppies at the Tower of London which we saw last weekend. As you can see it was pretty busy and although the crowds were very respectful I think that did somewhat detract from the solemnity of it:


(All photos taken with my i-pad)

Later today we will be visiting a 'living history' exhibit in the village. Here's the poster my wife did for it. I am also curious to see who will be playing the last post this morning. My son has done it the last two years but now he is away at university.


A somewhat belated update: And in case anyone was wondering, the 'Keep the Home Fires Burning' event was excellent; very moving and extremely well attended. Fulbourn was the host to one of the first convalescent hospitals and it was mostly (though not entirely) about that with many people taking the parts of wounded soldiers, nurses and other people connected to the hospital. An excellent piece of community theatre. Unfortunately I didn't have a camera with me, though. Well done to Jenny and all involved.

Sunday 19 October 2014

29 Let's Go


Like many on 'Planet Lard' I have bought a copy of the new Chain of Command supplement '29 Let's Go' this week. This is the first of Too Fat Lardies 'pint-sized' campaigns, so called because they are available for the princely sum £3.50, about the same as a pint of beer in a pub.

It depicts the advance by the US 29th Division just after D-day to take Isigny-sur-mer and allow a link up between the Omaha & Utah sectors. There are five scenario in all depicting historical encounters on 8th June.

I didn't buy this because I hope to play the campaign. As you will know if you've read some of my earlier posts my main interest in Chain of Command is VBCW, (which I am still working on btw). Indeed I don't run WWII games; if I did I would probably favour Operation Seelowe or maybe the Western Desert. All-in-all it's unlikely I will get into gaming Normandy.

So why did I buy it? Well it's for the historical interest. I visited Normandy on holiday earlier this year, so I was interested mainly to see where the games would be set & find out more. I am not disappointed. As is usual for Richard Clarke's work the depth of historical understanding is very impressive and its very clear that he has really done his research. There is a extended historical background section and it gave me several insights into the Omaha sector of the campaign that had escaped me until now; not least why the allies felt they had no choice but to land there (I may well be ignorant, I know...). So I would really recommend it just for that.

As for the games themselves, I will not say too much. They are of course, not balanced. The Americans, with many more assets have a fresh platoon for each game and plenty of Sherman tanks, whereas the Germans have to try desperately to make their resources last. You really get a feel for how thinly the Germans were stretched. On the other hand the Germans have only to slow down the yanks to 'win' the campaign on the basis that will allow their troops to escape to the other side of the Aure river (thereby preventing a link up to Utah).

All in all its fascinating stuff and excellent value too.

Saturday 27 September 2014

Quatre Bras - Age of Eagles

As I mentioned in the previous post, I have been hoping to play Quatre Bras using the Age of Eagles rules. Last weekend I managed to find the opportunity to do so, playing solo. Overall it was pretty successful and I found that the rules played quite quickly and easily (though inevitably for a first time out I got a few things wrong). I did run out of time unfortunately only getting through 9 turns (the game is supposed to last for 12 in all) but I think that the result was fairly clear by then; Vive L'Empereur!; the French had clear control of QB and had inflicted significantly more casualties than the Allies.


Here is the table without any troops on it, seen from the Allied side. I found I did not quite have enough trees and in the end I represented the Northern end of the Bossu, which should be woods almost all the way to QB, with a 'field' calling that a patch of rough terrain. There should also be a pond on the stream (behind the woods on the left) but unfortunately I found that the pond I had made were a little too large to be accommodated so I represented that with hedges along the side of the stream. Finally, in the end I added a bridge shown in later pictures at the Gemioncourt stream mainly for visual effect.


Here is the view at the start of the game (2:00pm) from the Allied side. You can see Bjilandt's brigade, with attached battery waiting just beyond the stream and Saxe-Weimar's Nassauers in the Bossu.


.. And here are the French. Each unit represents one brigade & you can see they heavily outnumber the allies initially, especially in cavalry (though there is little space space to maneuver all that cavalry in). According to the written scenario L'Heritier's division of dragoons & cuirassiers are also supposed to start but I decided to bring them on a little later as reinforcements. Even without them there's quite enough troops to cause congestion.


Here we are a couple of turns in. The French are beginning to get within range of their adversaries and have started to bombard them. In the distance you can maybe just make out the figure of Wellington watching cautiously from Quatre Bras itself.


Help begins to arrive for the Allies in the form of Van Merlen's Dutch-Belgian cavalry brigade followed closely by Picton's division; (I realised after the game that they were in the wrong place!)


Contact! Bjilandt's brigade is charged by both the French infantry of Bachelu's division and Pire's lancers. Having previously bombarded them with 3 batteries, the French had a serious advantage...


...And rolled well too, leaving Bjilandt's lot in flight. Still the clock is ticking (we're now on turn 4, 4pm) and the allies are arriving in more force.


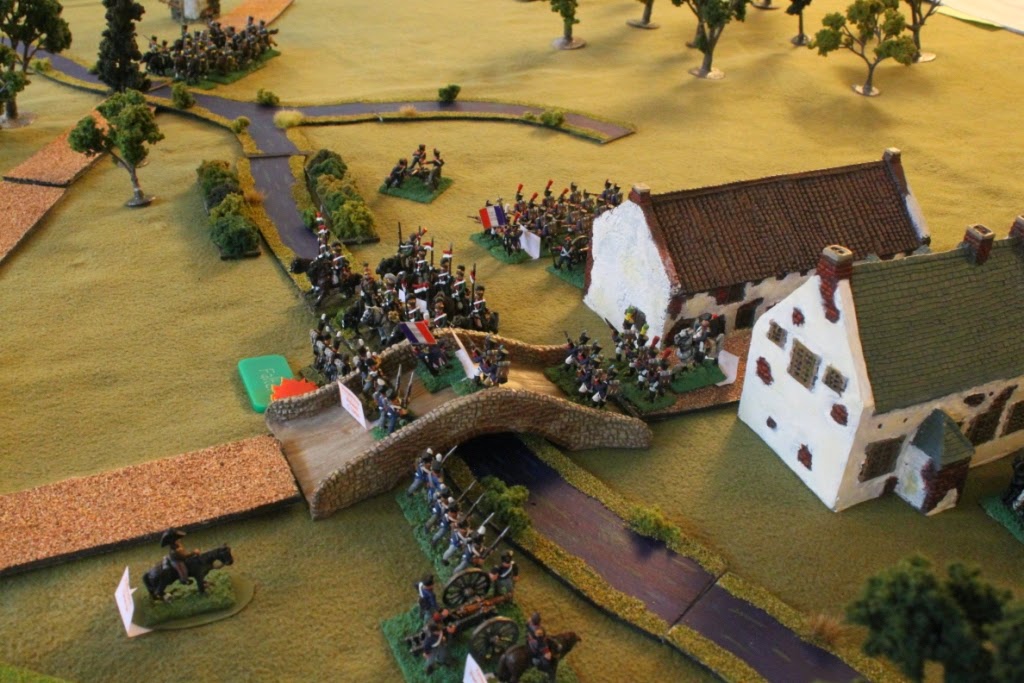
Merlen's cavalry who had attempted to support Bjilandt are countered by Lefebre-Desnouettes & the red (ie Dutch!) lancers. Something of a grudge match perhaps. This was to be the first of several clashes between these two units in which the Imperial lancers gradually pushed their opponents back, until eventually they were driven from the filed.


Here, a little later on turn 5 (4:30pm), we see probably the crucial moment of the battle. Kempt's brigade at the head of Picton's division is contacted by the French lancers. They are still in march column having been unluckily disordered by a bombardment and  stubbornly refused to change formation despite the urgings of Picton and the Duke himself. This is not looking good for the allies...Even though the highlanders are made of tough stuff they are pushed right back by the lancers allowing the French into Quatre Bras.


Meanwhile in the Bossu the Foy's division pushed back the Nassauers and then in a comedy moment the Nassuer's pushed themselves back a whole lot more by badly failing a 'march' roll when disordered. This left the French in undisputed control of the woods.


Here we see the position at the start of Turn 7 (indicated by the big D20). The French definitely have the upper hand though Allied reinforcements are coming to stem the tide. Heading to try to retake the Bossu are a brigade of Brunswickers while Alten's division is just arriving. At the right you can see the 'Arc of Fire' template which is a very handy (useful for other games too, I hope)


The Allied position begins to look more stable as they manage to form a line, from which they can counter-attack though its well back from Quatre Bras itself. The French meanwhile are struggling to bring up their artillery to help renew the assault.


Here you can see that the French are firmly in control of Quatre Bras though a Brigade of Brunswickers are preparing to challenge them for it. Just beyond QB a brigade of Brunswicker hussars (I admit that I used British hussars to represent them, shame!) are challenging French chasseurs.


In the Bossu the Brunswickers counterattacked but, after initial success, were repulsed. Meanwhile Foy is still struggling to bring up his artillery.


The Red lancers have finally seen off Merlen's brigade. They breakthrough onto Kempt's brigade but the doubty Scots formed square and repulsed them


A final desperate attack on Quatre Bras itself by the Brunswickers is repulsed. With that, the Allies withdrew in good order (and I called it a day) at the end of turn 9 (6:30pm).

Here are a few more pics of the final scene....


Saxe Weimar holds the line beyond the Bossu, now with support from Kielmansegge's Hanoverians.


Here you can see L'Heritier & his dragoons and beyond them are the Chasseurs de la Guarde & the masses of French infantry.


Four French generals...Kellerman doffs his hat to Ney in Gemioncourt (his cavalry didn't get into action). On the other side of the stream are Jerome (in the grey coat) and Reille.


Age of Eagles is hardly a 'buckets of dice' game. Here is the entire collection of dice which I used; 2 D20's (used as D10's).

As I said I enjoyed the game a lot and am very pleased with how it came out. The main mistake I made, I now realise, was with the Allied reinforcements as I brought almost all of them on at the Nivelles road. In fact, according to the scenario (and other sources)  Picton's Division and the Brunswickers arrived on the Brussels road which would make a significant difference.

I also think I used Built Up Areas which were a bit too big; I've seen it suggested that in AoE a typical BUA should be no more than 4" sq and sometimes 2"sq; my buildings were much bigger than that. There isn't a lot of space on the table and if I had used smaller BUAs it might have helped.

As for the rules I am pretty pleased with the way they went; I especially like the way that the labeling of the brigades (and leaders) means that you know exactly who is squaring up against each other. My main criticism would be that as Wellington has a +2 advantage (on a D10) over Ney on initiative he always consistently won, meaning that he always chose to go first in the turn making the game a bit IGO-UGO. If Ney had won the initiative at some point it could have had a big effect, not least as the French would then get two turns on the bounce.

Next up in my schedule is to play QB using the Too Fat Lardies LFS rules and see how that compares. It will be a bigger game as LFS works at a different level of AoE so I will need to get a few more troops: more French dragoons, another unit or two of French infantry and a couple of units of British guards (and maybe some Brunswick hussars!). Might be a little while though as I don't even have the figures yet & I have plenty of other painting to do.